The Code Window
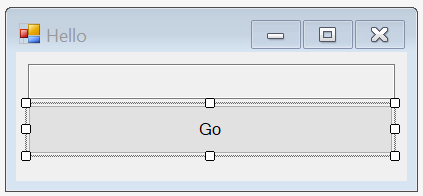
In the previous section, we designed the following GUI:
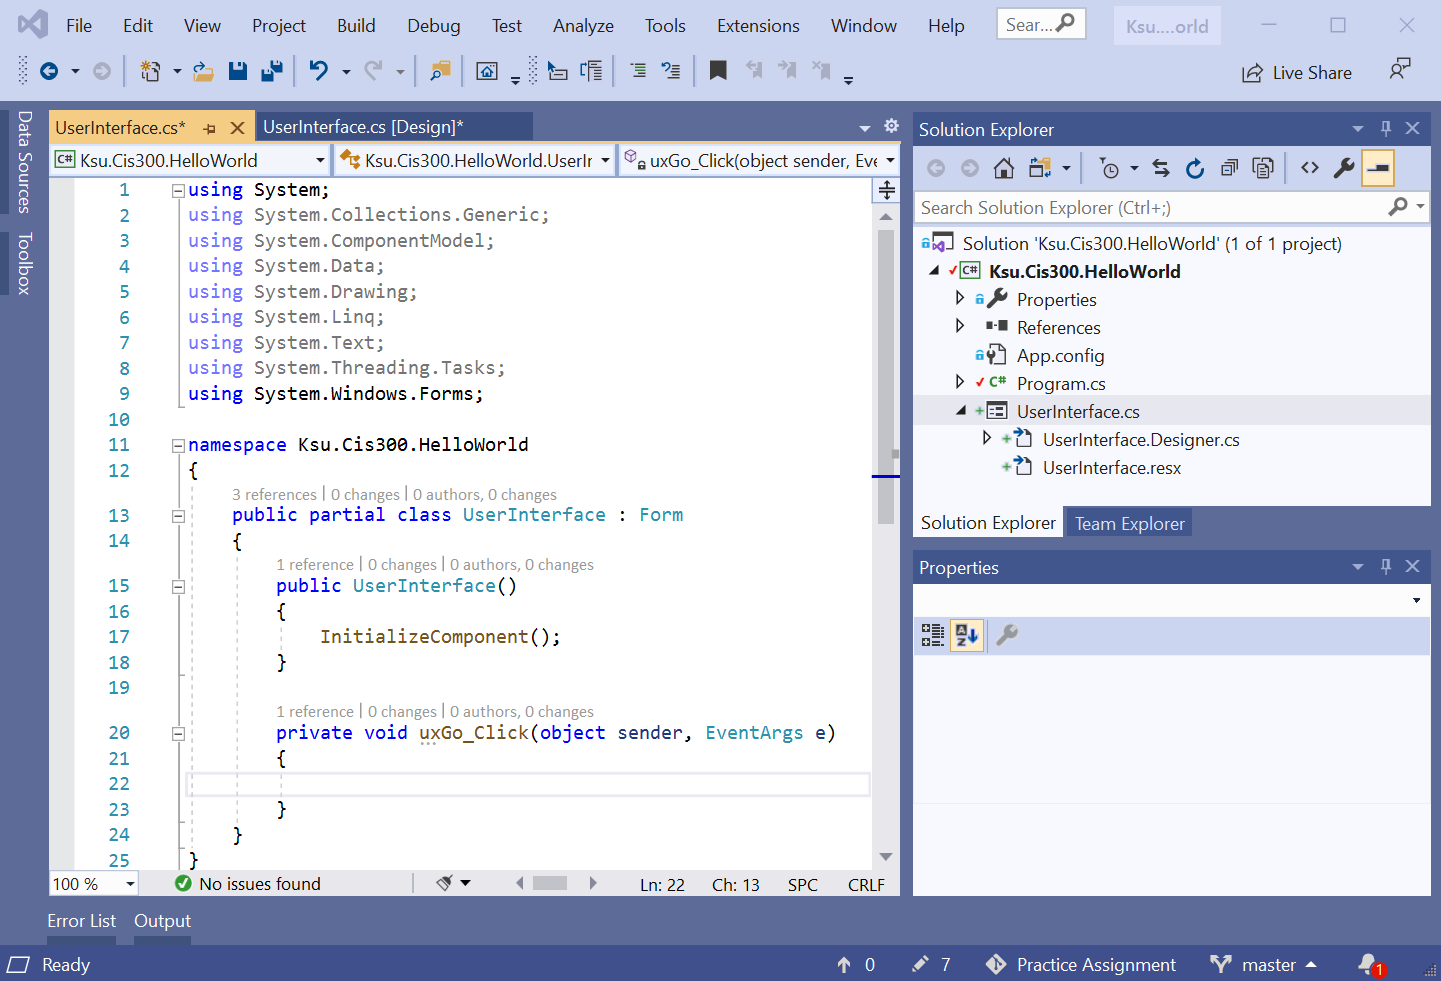
We also indicated briefly how functionality could be added to the button by double-clicking it in the design window to create an event handler. Creating this event handler also opens the code window to display it. The code window for this file can also be displayed by pressing F7 in the design window or by right-clicking the source code file name in the Solution Explorer and selecting “View Code”. Once a code window has been opened, it can be brought to the front by clicking the tab containing its file name near the top of the Visual Studio window. This window should look something like this:
Here is a ZIP archive containing the entire Visual Studio solution. After downloading and expanding it, you may need to navigate through a folder or two, but you should be able to find a file, Ksu.Cis300.HelloWorld.sln (the “.sln” suffix may not be visible, but it should show as type “Microsoft Visual Studio Solution”). If you double-click on this file, Visual Studio 2019 should open the solution.
Note in the class statement the keyword, partial. This indicates that not all of this class definition is in this file. The remainder of the definition is in the file, UserInterface.Design.cs. Recall that that file contains code for laying out the GUI and making the uxGo_Click method an event handler for the “Go” button. One of the method definitions that it contains is the InitializeComponent method, which does the layout of the GUI and sets up the event handlers. Recall also that the Main method in Program.cs constructs an instance of this class, then displays it and begins processing events for it. Because the constructor (see the code window above) calls the InitializeComponent method, everything will be set up to run the application - all that is needed is code for the event handler. This code will then be executed every time the “Go” button is clicked.
In order for this code to provide meaningful functionality, it will need to interact with the controls on the GUI. It needs to use their variable names to do this. The name of the TextBox in this code is uxDisplay (recall that you can find this variable name by opening the design window, clicking on the control, and finding its “(Name)” property in its Properties window). Suppose we want to respond to the event by placing the text, “Hello world!”, in this TextBox. We therefore need to change its Text property to contain this string; i.e.:
private void uxGo_Click(object sender, EventArgs e)
{
    uxDisplay.Text = "Hello world!";
}
Notice that when you type a quote mark, a matching quote is automatically added following the text cursor. As long as you don’t reposition the text cursor, you can just type the closing quote as you normally would after typing the text string — Visual Studio won’t insert another quote mark, but will move the text cursor past the one it inserted automatically. The same behavior occurs when you type open parentheses, brackets, or braces.
While we are here, we should also add appropriate comments to this method, the constructor, the class, and the file; for example:
/* UserInterface.cs
*  Author: Rod Howell
*/
using System;
using System.Collections.Generic;
using System.ComponentModel;
using System.Data;
using System.Drawing;
using System.Linq;
using System.Text;
using System.Threading.Tasks;
using System.Windows.Forms;

namespace Ksu.Cis300.HelloWorld
{
    /// <summary>
    /// A GUI for a Hello World program.
    /// </summary>
    public partial class UserInterface : Form
    {
        /// <summary>
        /// Constructs the GUI.
        /// </summary>
        public UserInterface()
        {
            InitializeComponent();
        }

        /// <summary>
        /// Handles a Click event on the "Go" button.
        /// </summary>
        /// <param name="sender"></param>
        /// <param name="e"></param>
        private void uxGo_Click(object sender, EventArgs e)
        {
            uxDisplay.Text = "Hello world!";
        }
    }
}
The code window has several features that help with code writing. One of these features is auto-completion. Often while you are typing code, an auto-complete list appears, often with an entry highlighted. When an entry is highlighted (either automatically or by your selecting it manually), pressing “Enter” or typing a code element that can’t be part of the name (such as “.” or “+") will insert the completion into your code. Once you get used to this feature, it can greatly speed up your code entry. Furthermore, it can be a helpful reminder of what you might need to type next. If you don’t want a name to auto-complete (perhaps because it is a name you haven’t defined yet), you can press “Esc”, and the auto-complete list will disappear.
Another feature of the code window is parameter information that shows as a popup box when you are typing a parameter list in a method call; for example:
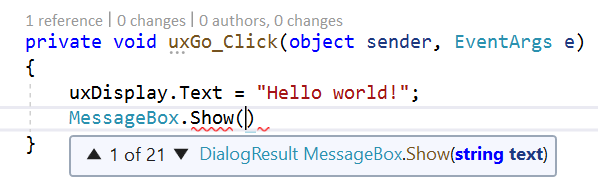
This popup box gives the return type of the method, followed by the name of the method, followed by the parameter list, with the type of each parameter shown and the current parameter in bold face. When there are more than one method with the same name, this is indicated in the upper-left corner of the popup box (“1 of 21” in the figure above — the method shown is the first of 21 methods having that name). You can use either the arrows in the popup box or the up and down arrows on the keyboard to scroll through these different methods.
A related feature allows certain information to be obtained by hovering the mouse over different code elements. For example, hovering the mouse over an identifier will display the declaration and documentation for that identifier in a popup box. Also, hovering the mouse over a syntax error (indicated by a red underline, as shown under “Show” in the above figure) will display an explanation of the error, in addition to any information on the code element.
Finally, Visual Studio gives rich support for renaming identifiers in a consistent way. For example, suppose we have a method called DoSomething, and we want to rename it to DoSomethingElse. We can make this change easily by right-clicking on the name, DoSomething, and selecting “Rename…” from the resulting popup menu. Then change the name, which will now be highlighted, and press “Enter”. Doing this will rename the method consistently throughout your solution, changing only those instances that refer to this method if there are other identifiers with the same name. The same mechanism can be used to rename variables safely.