Subsections of Stacks and Queues
Introduction to Stacks
Introduction to Stacks
A stack provides last-in-first-out (LIFO) access to data items. We
usually think of a stack as arranging data items vertically, like a
stack of trays in a cafeteria. Access is normally provided only at the
top of the stack; hence, if we want to add an item, we push it onto
the top, and if we want to remove an item, we pop it from the top.
Because we only access the top of the stack, the item that we pop is
always the remaining item that we had pushed the most recently.
.NET provides two kinds of stacks. One is the
Stack
class found in the
System.Collections
namespace. Because this namespace isn’t typically included in the list of namespaces searched by the compiler, but the namespace containing the other Stack definition (discussed a bit later below) is included, we need to refer to it in code as System.Collections.Stack. This class provides a stack of object?s. Because every
type in C# is a subtype of object, we can push any data items we
want onto a Stack. Because object? is a nullable
type, we can even push null. The most commonly-used public members of this
class are:
- A
constructor
that takes no parameters and constructs an empty stack.
- A
Count
property, which gets the number of elements on the Stack as an
int.
- A
Push
method, which takes a single parameter of type object?, and
pushes it onto the top of the Stack.
- A
Peek
method, which takes no parameters and returns the element at the top
of the Stack (as an object?) without changing the Stack’s
contents. If the Stack is empty, this method throws an
InvalidOperationException.
- A
Pop
method, which takes no parameters, and removes and returns the
element at the top of the Stack (as an object?). If the
Stack is empty, this method throws an
InvalidOperationException.
As we mentioned above, because the Push method takes an object?
as its parameter, we can push any data elements we want, including null, onto a
Stack. What this means, however, is that the compiler can’t
determine the type of these elements when we retrieve them; i.e., both
the Peek and Pop methods return object?s. Thus, for example,
the following code will not compile:
System.Collections.Stack s = new();
s.Push(7);
int n = s.Pop() + 1;
The problem is that the Pop method returns an object?, and we
can’t add an int to an object?. Although it’s pretty easy to see
from this code that Pop will return 7, in many cases it’s impossible
to know at compile time the exact type of the element returned (for
example, the Stack may be a parameter to a public method, and that method
may be called by code that has not yet been written). Consequently, the
compiler simply uses the return type of Pop - it doesn’t even try to
figure out the type any more precisely.
If you want to use the value returned by Pop
or Peek as something other than an object?, you need to tell the
compiler what its type actually is. You do this with a cast:
int n = (int)s.Pop() + 1;
This tells the compiler to assume that the value returned by Pop is
an int. The type is still checked, but now it is checked at run
time, rather than at compile time. If the runtime environment detects
that the value is not, in fact, an int, it will throw an
InvalidCastException.
While the above line of code will now compile, it generates a warning because Pop might return null, which cannot be cast to int. In order to avoid this warning, once we have determined that the call won’t return a null value, we need to use the ! operator:
// The element on the top of the stack is the int 7
int n = (int)s.Pop()! + 1;
Note that we include a comment explaining why Pop won’t return null here.
Often when we need a stack, the data items
that we wish to store are all of the same type. In such a case, it is
rather awkward to include a cast whenever we retrieve an item from the
stack. In order to avoid this casting, .NET provides a
generic stack,
Stack<T>
,
found in the
System.Collections.Generic
namespace. The T within angle brackets is a type parameter - we
may replace it with any type we want. This type tells what type of
elements may be placed in this stack. For example, if we want a stack
that will only contain ints, we can write:
This class has members similar to those listed above for the non-generic
Stack class, except that the Push method takes a parameter of
type T (i.e., whatever type we placed within the angle brackets in
the type declaration and constructor call), and the Peek and Pop
methods each return a value of type T. As a result, the following is
now legal code:
Stack<int> s = new();
s.Push(7);
int n = s.Pop() + 1;
We will show how you can define your own generic types in “Implementing
a Stack
”. First, however,
we want to work through two example applications of stacks. We will do
that in the next two sections.
Implementing Undo and Redo for a TextBox
Implementing Undo and Redo for a TextBox
A TextBox has a rather crude Undo/Redo feature. By right-clicking on
a TextBox, a popup menu containing an Undo entry is presented. This
Undo will undo only one action, which may include several edits. An
immediate subsequent Undo will undo the Undo - in essence, a Redo. The
same behavior can be achieved using Ctrl+Z. A more powerful Undo/Redo
feature would allow an arbitrary sequence of edits to be undone, with
the option of redoing any of these Undo operations. This section
outlines various ways of implementing such a feature.
We first observe that when we perform an Undo, we want to undo the most
recent edit that has not been undone; i.e., we need LIFO access to the
edits. Likewise, when we perform a Redo, we want to redo the most recent
Undo that has not been redone. Again, we need LIFO access to the Undo
operations. We will therefore use two stacks, one to keep the edit
history, and one to keep the Undo history (i.e., the history of Undo
operations that can be redone).
Before we can define these stacks, we need to determine what we will be
storing in them; i.e., we need to determine how we will represent an
edit. We will consider several ways of doing this, but the simplest way
is to store the entire contents of the TextBox after each edit.
Proceeding in this way, we really aren’t representing edits at all, but
we certainly would have the information we need to undo the edits.
Likewise, the Undo history would store the entire contents of the
TextBox prior to each Undo. Because the contents of the TextBox
form a string, we need two private fields, each referring to a
stack of strings:
/// <summary>
/// The history of the contents of the TextBox.
/// </summary>
private Stack<string> _editingHistory = new();

/// <summary>
/// The history of TextBox contents that have been undone and can be redone.
/// </summary>
private Stack<string> _undoHistory = new();
Before we can proceed to implementing the Undo and Redo operations, we
need to do a bit more initialization. Note that by the way we have
defined _editingHistory, this stack needs to contain the initial
contents of the TextBox. Therefore, assuming the TextBox field
is named uxEditBuffer, we need to add the following line to the end of
the constructor of our user interface:
_editingHistory.Push(uxEditBuffer.Text);
In order to support Undo and Redo, we need to be able to record the
content of uxEditBuffer each time it is modified. We can do this via an
event handler for the TextChanged event on the TextBox. Because
this event is the default event for a TextBox, we can add such an
event handler by double-clicking on the TextBox within the Visual
Studio® Design window. This event handler will then be called every
time the contents of the TextBox are changed.
We need to deal with one important issue before we can write the code
for this event handler. Whenever we perform an Undo or Redo operation,
we will change the contents of the TextBox. This will cause the
TextChanged event handler to be called. However, we don’t want to
treat an Undo or a Redo in the same way as an edit by the user. For
example, if the user does an Undo, we don’t want that Undo to be
considered an edit, or a subsequent Undo would just undo the Undo; i.e.,
it would perform a Redo rather than an Undo.
Fortunately, there is an easy way to distinguish between an edit made by
the user and a change made by the program code. A TextBox has a
Modified
property, which is set to true when the user modifies the
TextBox contents, and is set to false when the program modifies
the contents. Thus, we only want to record the TextBox contents when
this property is true. Assuming the TextBox is named
uxEditBuffer, we can then set up the event handler as follows:
/// <summary>
/// Handles a TextChanged event on the edit buffer.
/// </summary>
/// <param name="sender">The object signaling the event.</param>
/// <param name="e">Information about the event.</param>
private void EditBufferTextChanged(object sender, EventArgs e)
{
    if (uxEditBuffer.Modified)
    {
        RecordEdit();
    }
}
Now let’s consider how to write the RecordEdit method. Suppose there
are two GUI controls (e.g., menu items or buttons) called uxUndo and
uxRedo, which invoke the Undo and Redo operations, respectively. These
controls should be enabled only when there are operations to undo or
redo. Thus, initially these controls will be disabled. Whenever the user
modifies the contents of the TextBox, we need to do the following:
- Push the resulting text onto
_editingHistory.
- Enable
uxUndo, as there is now an edit that can be undone.
- Clear the contents of
_undoHistory, as the last change to the
TextBox contents was not an Undo. (A Stack<T> has a
Clear
method for this purpose.)
- Disable
uxRedo.
We therefore have the following method:
/// <summary>
/// Records an edit made by the user.
/// </summary>
private void RecordEdit()
{
    _editingHistory.Push(uxEditBuffer.Text);
    uxUndo.Enabled = true;
    _undoHistory.Clear();
    uxRedo.Enabled = false;
}
Now that we have a mechanism for recording the user’s edits, we can
implement the Undo operation. The contents of the TextBox following
the last edit (i.e, the current contents of the TextBox) should
always be at the top of _editingHistory. An Undo should change the
current contents to the previous contents - i.e., to the next
string on _editingHistory. However, we don’t want to lose the top
string, as this is the string that would need to be restored by
a subsequent Redo. Instead, we need to push this string onto
_undoHistory. We then need to enable uxRedo. In order to determine
whether uxUndo should be enabled, we need to know how many elements
remain in _editingHistory. We know there is at least one string on
this stack - the string that we placed in the TextBox. There is
an edit to undo if there is at least one more element on this stack -
i.e., if its Count is greater than 1. We therefore have the
following event handler for a Click event on uxUndo:
/// <summary>
/// Handles a Click event on Undo.
/// </summary>
/// <param name="sender">The object signaling the event.</param>
/// <param name="e">Information about the event.</param>
private void UndoClick(object sender, EventArgs e)
{
    _undoHistory.Push(_editingHistory.Pop());
    uxRedo.Enabled = true;
    uxEditBuffer.Text = _editingHistory.Peek();
    uxUndo.Enabled = _editingHistory.Count > 1;
}
The implementation of Redo is similar, but now we need to transfer a
string between the stacks in the opposite direction - we move the
top string from _undoHistory to _editingHistory. Then uxRedo
should be enabled if any more strings remain in _undoHistory. The
string we removed from _undoHistory should be placed in the
TextBox. Finally, uxUndo should be enabled. We therefore have the
following event handler for a Click event on uxRedo:
/// <summary>
/// Handles a Click event on Redo.
/// </summary>
/// <param name="sender">The object signaling the event.</param>
/// <param name="e">Information about the event.</param>
private void RedoClick(object sender, EventArgs e)
{
    _editingHistory.Push(_undoHistory.Pop());
    uxRedo.Enabled = _undoHistory.Count > 0;
    uxEditBuffer.Text = _editingHistory.Peek();
    uxUndo.Enabled = true;
}
This solution will work, except that an Undo or Redo always brings the
text caret to the beginning of the TextBox contents. Furthermore, if
the TextBox contains a long string, each edit causes a long
string to be placed onto _editingHistory. This can quickly eat up
a lot of memory, and may eventually fill up all available storage. In
what follows, we will outline two better approaches.
The idea for both of these approaches is that instead of recording the
entire contents of the TextBox for each edit, we only record a
description of each edit. A single edit will either be an insertion or a
deletion of some text. The number of characters inserted/deleted may
vary, as the edit may be a cut or a paste (if we select a block of text
and do a paste, the TextChanged event handler is actually called
twice - once for the deletion of the selected text, and once for the
insertion of the pasted text). We can therefore describe the edit with
the following three values:
- A bool indicating whether the edit was an insertion or a
deletion.
- An int giving the index of the beginning of the edit.
- The string inserted or deleted.
We can maintain this information in stacks in one of two ways. One way
is to use non-generic stacks and to push three items onto a stack for
each edit. If we do this, we need to realize that when we pop elements
from the stack, they will come out in reverse order from the way they
were pushed onto it. Alternatively, we can define a class or a
structure
to represent an
edit using the three values above as private fields. We can then use
generic stacks storing instances of this type.
Whichever way we choose to represent the edits, we need to be able to
compute each of the three pieces of information describing the edit. In
order to compute this information, we need to compare the current
contents of the TextBox with its prior contents in order to see how
it changed. This means that, in addition to the two private fields
we defined for the stacks, we will also need a private field to
store the last string we saw in the TextBox. Rather than
initializing _editingHistory within the constructor, we should now
initialize this string in its place (because there will have been no
edits initially, both stacks should initially be empty). If we keep this
string field up to date, we will always have a “before” picture (the
contents of this field) and an “after” picture (the current contents of
the TextBox) for the edit we need to record.
To determine whether the edit was an insertion or a deletion, we can
compare the lengths of the current TextBox contents and its previous
contents. If the current content is longer, then the edit was an
insertion; otherwise, the edit was a deletion. We therefore have the
following method for this purpose:
/// <summary>
/// Returns whether text was deleted from the given string in order to
/// obtain the contents of the given TextBox.
/// </summary>
/// <param name="editor">The TextBox containing the result of the edit.</param>
/// <param name="lastContent">The string representing the text prior
/// to the edit.</param>
/// <returns>Whether the edit was a deletion.</returns>
private bool IsDeletion(TextBox editor, string lastContent)
{
    return editor.TextLength < lastContent.Length;
}
Note that the above code uses the TextBox’s
TextLength
property. This is more efficient than finding the length of its Text
property because evaluating the Text property requires all the
characters to be copied to a new string.
Before getting either the location of the edit or the edit string
itself, it is useful to compute the length of the edit string. This
length is simply the absolute value of the difference in the lengths of
the string currently in the TextBox and the last string we
saw there. The
Math
class (in the
System
namespace) contains a
static
method
Abs
,
which computes the absolute value of an int. We therefore have the
following method:
/// <summary>
/// Gets the length of the text inserted or deleted.
/// </summary>
/// <param name="editor">The TextBox containing the result of the edit.</param>
/// <param name="lastContent">The string representing the text prior
/// to the edit.</param>
/// <returns>The length of the edit.</returns>
private int GetEditLength(TextBox editor, string lastContent)
{
    return Math.Abs(editor.TextLength - lastContent.Length);
}
Now that we can determine whether an edit is a deletion or an insertion,
and we can find the length of the edit string, it isn’t hard to find the
beginning of the edit. First, suppose the edit is a deletion. The point
at which the deletion occurred is the point at which the text caret now
resides. We can find this point using the TextBox’s
SelectionStart
property. When there is no current selection - and there never will be
immediately following an edit - this property gives the location of the
text caret in the TextBox. Now consider the case in which the edit
was an insertion. When text is inserted into a TextBox, the text
caret ends up at the end of the inserted text. We need to find its
beginning. We can do this by subtracting the length of the edit string
from the text caret position. We therefore have the following method:
/// <summary>
/// Gets the location of the beginning of the edit.
/// </summary>
/// <param name="editor">The TextBox containing the result of the edit.</param>
/// <param name="isDeletion">Indicates whether the edit was a deletion.</param>
/// <param name="len">The length of the edit string.</param>
/// <returns>The location of the beginning of the edit.</returns>
private int GetEditLocation(TextBox editor, bool isDeletion, int len)
{
    if (isDeletion)
    {
        return editor.SelectionStart;
    }
    else
    {
        return editor.SelectionStart - len;
    }
}
The last piece of information we need is the string that was deleted
or inserted. If the edit was a deletion, this string can be found in
the previous TextBox contents. Its beginning is the point at which
the edit occurred. We can therefore extract the deleted string from
the previous contents using its
Substring
method. We pass this method the beginning index of the substring and its
length, and it returns the substring, which is the deleted string.
On the other hand, if the edit was an insertion, we can find the
inserted string in the current TextBox contents by using its
Substring in a similar way. We therefore have the following method:
/// <summary>
/// Gets the edit string.
/// </summary>
/// <param name="content">The current content of the TextBox.</param>
/// <param name="lastContent">The string representing the text prior
/// to the edit.</param>
/// <param name="isDeletion">Indicates whether the edit was a deletion.</param>
/// <param name="editLocation">The location of the beginning of the edit.</param>
/// <param name="len">The length of the edit.</param>
/// <returns>The edit string.</returns>
private string GetEditString(string content, string lastContent, bool isDeletion, int editLocation, int len)
{
    if (isDeletion)
    {
        return lastContent.Substring(editLocation, len);
    }
    else
    {
        return content.Substring(editLocation, len);
    }
}
Using the methods above, we can modify the RecordEdit method to
obtain the three values listed above to describe an edit. Once we have
placed these three values onto the stack of editing history, we also
need to update the string giving the previous TextBox contents.
This should now be the current TextBox contents. We can then finish
the method as shown above.
In order to implement Undo and Redo, we need to be able to insert and
delete text in the TextBox. A string has two methods we can use
to accomplish this:
- The
Remove
method takes as its parameters the beginning index and length of the
portion to remove, and returns the result.
- The
Insert
method takes as its parameters the index at which the string
should be inserted, and the string to insert. It returns the
result.
Given the location of the edit along with the edit string itself, we can
easily provide the parameters to the appropriate method above.
Furthermore, it is not hard to set the location of the text caret using
the TextBox’s SelectionStart property - we just need to be sure
to add the length of the edit string if we are inserting text. The
following method therefore performs a given edit, updating the
string containing the last contents of the TextBox as well (we
assume this string is called _lastText):
/// <summary>
/// Performs the given edit on the contents of the given TextBox.
/// </summary>
/// <param name="editor">The TextBox to edit.</param>
/// <param name="isDeletion">Indicates whether the edit is a deletion.</param>
/// <param name="loc">The location of the beginning of the edit.</param>
/// <param name="text">The text to insert or delete.</param>
private void DoEdit(TextBox editor, bool isDeletion, int loc, string text)
{
    if (isDeletion)
    {
        _lastText = editor.Text.Remove(loc, text.Length);
        editor.Text = _lastText;
        editor.SelectionStart = loc;
    }
    else
    {
        _lastText = editor.Text.Insert(loc, text);
        editor.Text = _lastText;
        editor.SelectionStart = loc + text.Length;
    }
}
We can now implement event handlers for Undo and Redo. We can obtain the
description of the edit from the stack of editing history for an Undo,
or from the stack of undo history for a Redo. This description gives us
the type of edit (i.e., either insertion or deletion), the beginning
position of the edit, and the inserted or deleted string. To
implement a Redo, we simply do this edit, but to implement an Undo, we
must do the opposite.
Parenthesis Matching
Parenthesis Matching
The problem of finding matching parentheses must be solved in many
computing applications. For example, consider a C# compiler. Matching
parentheses (( and )), brackets ([ and ]), and braces ({ and
}) delimit various parts of the source code. In order for these parts
to be interpreted correctly, the compiler must be able to determine how
these different kinds of parentheses match up with each other. Another
example is processing structured data stored in XML format. Different
parts of such a data set are delimited by nested begin tags like
<summary> and end tags like </summary> (documentation comments
in C# code are in XML format). These tags are essentially different
kinds of parentheses that need to be matched.
We will restrict our attention to parentheses, brackets, and braces. We
will call all six of these characters “parentheses”, but will divide
them into three types. Each type then has an opening parenthesis and a
closing parenthesis. We will define a string restricted to these six
characters to be matched (or balanced) if we can repeatedly remove
an opening parenthesis and a closing parenthesis of the same type to its
immediate right until there are no more parentheses.
For example, suppose we have the string, “([]{()[]})[{}]”. We can
apply the matching-pair removal process described above as follows
(blank space is inserted to make it easier to see which parentheses are
removed):
    ([]{()[]})[{}]
    (  {()[]})[{}]
    (  {  []})[{}]
    (  {    })[{}]
    (        )[{}]
              [{}]
              [  ]
Hence, this string is matched. On the other hand, consider the
string, “([]{()[])}[{}]”. When we apply the above process to this
string, we obtain:
    ([]{()[])}[{}]
    (  {()[])}[{}]
    (  {  [])}[{}]
    (  {    )}[{}]
    (  {    )}[  ]
    (  {    )}
and we can go no further. Hence, this string is not matched.
We can extend the definition of a matched string to include other
characters if we first remove all other characters before we begin the
matching-pair removal process. In what follows, we will focus on the
problem of determining whether a given string is matched.
The matching-pair removal process shown above gives us an algorithm for
determining whether a string is matched. However, if implemented
directly, it isn’t very efficient. Changes to a string are
inefficient because the entire string must be reconstructed. We
could use a StringBuilder, but even then, removing characters is
inefficient, as all characters to the right of the removed character
must be moved to take its place. Even if we simply change parentheses to
blanks, as we did in the above example, searching for matching pairs is
still rather expensive.
What we would like to do instead is to find a way to apply the
matching-pair removal process while scanning the string once. As we
are scanning the string, we don’t want to spend time searching for a
matching pair. We can do this if, while scanning the string, we keep
all unmatched opening parentheses in a stack. Then the parenthesis at
the top of the stack will always be the rightmost unmatched opening
parenthesis. Thus, starting with an empty stack, we do the following for
each character in the string:
- If the character is a opening parenthesis, push it onto the stack.
- If the character is a closing parenthesis:
- If the stack is nonempty, and the current character matches the
character on top of the stack, remove the character from the top
of the stack.
- Otherwise, the string is not matched.
- Ignore all other characters.
If the stack is empty when the entire string has been processed,
then the string is matched; otherwise, it is not.
For example, consider the string, “{a[b]([c]){de}}f[(g)]”. In what
follows, we will simulate the above algorithm, showing the result of
processing each character on a separate line. The portion of the line
with an orange background will be the stack contents, with the top element
shown at the right. We will insert blank space in the orange area for
clarity, but the stack will only contain opening parentheses. The first
character with a gray background is the character currently being
processed.
{a[b]([c]){de}}f[(g)]    --- an opening parenthesis - push it onto the stack
{a[b]([c]){de}}f[(g)]    --- ignore
{ [b]([c]){de}}f[(g)]    --- push onto stack
{ [b]([c]){de}}f[(g)]    --- ignore
{ [ ]([c]){de}}f[(g)]    --- closing parenthesis that matches the top - remove top
{    ([c]){de}}f[(g)]    --- push onto stack
{    ([c]){de}}f[(g)]    --- push onto stack
{    ([c]){de}}f[(g)]    --- ignore
{    ([ ]){de}}f[(g)]    --- a match - remove top
{    (   ){de}}f[(g)]    --- a match - remove top
{         {de}}f[(g)]    --- push onto stack
{         {de}}f[(g)]    --- ignore
{         { e}}f[(g)]    --- ignore
{         {  }}f[(g)]    --- a match - remove top
{             }f[(g)]    --- a match - remove top
               f[(g)]    --- ignore
                [(g)]    --- push onto stack
                [(g)]    --- push onto stack
                [(g)]    --- ignore
                [( )]    --- a match - remove top
                [   ]    --- a match - remove top
                         --- end of string and stack empty - matched string
If at any time during the above process we had encountered a closing
parenthesis while the stack was empty, this would have indicated that
this closing parenthesis has no matching opening parenthesis. In this
case, we would have stopped immediately, determining that the string
is not matched. Likewise, if we had encountered a closing parenthesis
that did not match the parenthesis at the top of the stack, this would
have indicated a mismatched pair. Again, we would have stopped
immediately. Finally, if we had reached the end of the string with a
nonempty stack, this would have indicated that we had at least one
opening parenthesis that was never matched. We would have again
determined that the string is not matched.
Implementing a Stack
Implementing a Stack
This section gives an overview of perhaps the most common way to
implement a stack. For example, the implementations of both
System.Collections.Stack and
System.Collections.Generic.Stack<T> use this technique. This
implementation uses an array to store the elements of the stack, and is
quite similar to the StringBuilder
implementation
we
described in the last chapter. We have discussed two kinds of stacks in
this chapter - stacks of object?s and generic stacks. We will focus
on implementing a generic stack in this section, as it is easy to modify
such an implementation to be non-generic.
We first need to consider how to define a
generic class. In the simplest case, we simply add a type parameter to
the class statement, as follows:
public class Stack<T>
{
    . . .
}
Within this class definition, T is treated like any other type,
except that the compiler knows nothing about it. We can declare fields,
parameters, and local variables to be of type T. Even though the
compiler knows nothing about T, it will still do type checking - you
cannot assign an expression of any other type to a variable of type
T, and you can only assign an expression of type T to variables
of either type T or type object? (because any type is a subtype
of object?). Assigning an expression of type T to an object variable may generate a compiler warning, but is permitted as well. In general, we can define generic data types with any
number of type parameters if more that one generic type is needed by the
data structure. To do this, we would list the type parameters, separated
by commas, between the < and > symbols of the generic class
definition. Each of the type parameters is then treated as a type within
the class definition. We will show how the types passed as type
parameters can be restricted in a later
section
.
For the class Stack<T>, only one type parameter is needed. The
type parameter T denotes the type of the values that are stored in
the stack. Therefore, the array in which we will store the elements will
be of type T?[ ]. The ? is needed because if a reference type is used for T, when the array is constructed, all locations will initially store null, and will continue to store null until stack elements are placed into them.
Note
In the section, “Reference Types and Value Types”
, we explained how the ? operator behaves differently depending on whether the underlying type is a reference type or a value type. Because a type parameter might represent either a reference type or a value type, we need to address how this operator behaves for a type parameter. Similar to its behavior for a reference type, when this operator is used with a type parameter, the code produced is unchanged. Instead, it is simply an annotation indicating that null values may be present. Note that this can happen only if the underlying type happens to be a reference type.
As in the StringBuilder
implementation
,
we will need a private field for this array. This field can be
initialized in a manner similar to the StringBuilder implementation;
hence, we don’t need to write a constructor.
A stack has a public read-only property, Count, which gets the
number of elements in the stack (as an int). We can define this
property to use the default implementation with a private set
accessor, as outlined in the section,
“Properties
”.
Before we can delve any further into the implementation, we need to
decide how we are going to arrange the elements in the array. Because
all of our accesses will be to the top of the stack, it makes sense to
keep the bottom element of the stack at location 0, and as we go up the
stack, keep each successive element in the next location:
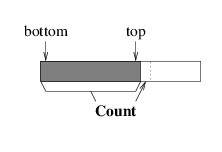
This arrangement makes sense because unless all of the array locations
are being used, there is room to push a new element on top of the stack
without having to move any pre-existing elements out of its way.
Note the similarity of this arrangement to the implementation of a
StringBuilder
.
Given this similarity, we can implement the Push method in a similar
way to how we implemented the Append method for a StringBuilder.
Instead of taking a char parameter, the Push method takes a
T parameter, but this is the type that we can store in the array.
The biggest difference in these two methods is that while Append
returns a StringBuilder, Push returns nothing.
We now need to implement the public methods that retrieve elements
from the stack. We will start with the Peek method, which takes no
parameters and returns a T. This method needs to begin with some
error checking: if there are no elements in the stack, it needs to throw
an InvalidOperationException. We can do this by constructing such an
exception and throwing it with the throw keyword:
throw new InvalidOperationException();
If there are elements in the stack, we need to return the one at the
top. Note from the figure above that the top element is at the location
preceding the location indexed by Count. However, note that this element is of type T?, whereas the return type of Peek is T. Thus, returning this element will generate a warning unless we use the ! operator. This operator is safe to use here because the location we are returning stores an element that was passed to Push as type T.
Note
Note that because T can represent any type, it is possible that it represents a nullable type; for example, it is permissible to define a Stack<string?>. Therefore, it is possible that the element being returned is null. However, we don’t need to concern ourselves with this case, as it will be handled by the calling code. The point is that we are returning something of type T, even if T represents a non-nullable reference type.
The other public method to retrieve an element is the Pop
method. This method also takes no parameters and returns a T. Part
of what it does we have already implemented in the Peek method. In
order to avoid duplicating code, we can retrieve the top element using
the Peek method, and save it in a local variable so that we can
return it when we are finished with this method (avoiding code
duplication improves maintainability, as there are fewer places that
might need to be modified later). Note that by using the Peek
method, we are taking advantage of the fact that it checks whether the
stack is empty; hence, there is no need to do that here. Before we can
return the value we retrieved, we need to update Count to reflect
the fact that we are removing one element.
While what we have described in the preceding paragraph is sufficient
for correct functioning, there is one issue we need to address. Note
that we have done nothing to the array location that stored the value we
popped - it still stores that value. This fact does not impact
correctness, however, because after we update the number of elements, we
are no longer considering that location to be storing a stack element -
its contents are irrelevant. Nevertheless, there is a performance issue here.
If T is a reference
type
, then the
reference stored in this location may refer to a large data structure
that is no longer needed by the program. Because this array location
still stores a reference to it, the garbage collector cannot tell that
it is no longer in use, and consequently, it cannot reclaim the storage.
It therefore makes sense to remove what is stored in this array
location. However, we run into a difficulty when we try to do this. We
can’t simply assign null to this location because T might be a
value type; hence, the compiler will not allow such an assignment. In
order to address this problem, C# has the keyword, default, which
can be used to get the default value for a given type. Thus, if T is
a reference type, default(T) will give us null, but if T is
a value type, it will give us the value whose binary representation is
all 0s. In order to free up any memory we might no longer need, it
therefore makes sense to assign default(T) to an array location
after we are no longer using it.
Tip
Often the parameter to default (including the parentheses) can be
omitted because the compiler
can detect what type is needed. This is the case in the current
context. If using default without the
parameter gives a syntax error, supply the parameter.
Finally, we can implement a public Clear method. This method takes
no parameters and returns nothing. One way to implement it would be to
pop all of the elements, one by one, from the stack. However, this could
be very inefficient if the stack contains a lot of elements. A better
way is simply to change Count to 0; however, this way prevents the
garbage collector from reclaiming storage we no longer need. In order to
allow this storage to be reclaimed, we should also replace our array
with a new array of the size we used when we initialized this field
(note that this is more efficient than replacing every element with the
default element of the appropriate type). Because we are no longer using
the old array, the garbage collector can reclaim it, along with any
otherwise unused data it might refer to.
Due to the similarities between this implementation and the
StringBuilder
implementation
,
the two data structures have similar performance characteristics. In
fact, it is possible to show that any sequence of n operations on an
initially empty Stack<T> is done in O(n) time - i.e., in time
proportional to n.
Introduction to Queues
Introduction to Queues
Stacks provide LIFO access to data, but sometimes we need
first-in-first-out, or FIFO, access.
Consider, for example, the computation of capital gains from stock
sales. Typically an investor will buy shares of a stock commodity at
various times and for different prices. When shares are sold, the amount
of money received doesn’t depend on which shares of a given commodity
are sold, as each share is worth the same amount at that time. Likewise,
the unsold shares of that commodity each have the same value. However,
for accounting purposes, it does matter. Specifically, the capital
gain for that sale is defined to be the amount received from the sale
minus the amount originally paid for those shares, assuming the shares
sold are the oldest shares of that commodity owned by the investor.
Suppose now that we want to compute the capital gains from sales of
stock. As shares are purchased, we need to record the purchase price of
each share, along with the order in which the shares were purchased. As
shares are sold, we need to retrieve the original purchase price of the
oldest shares of each commodity sold. We therefore need
first-in-first-out access to the purchase prices of the shares of each
commodity owned. To keep this relatively simple, in what follows we will
assume that we only need to keep track of one stock commodity.
A queue provides FIFO access to data items. Like a stack, a queue is a
sequence of data items. However, a queue behaves more like a line of
people at a ticket counter. Each person who enters the queue enters at
the back, and the next person who is served is the person at the
front. Thus, the people in the queue are served in FIFO order.
Likewise, new data items are added to the back of a queue, and data
items are retrieved from the front.
.NET provides both a non-generic queue of object?s
(System.Collections.Queue
)
and a generic queue
(System.Collections.Generic.Queue<T>
).
For simplicity, we will focus on the generic version. The non-generic
version is the same, except that wherever the type parameter T is
used in the generic version, object? is used in the non-generic
version.
Like Stack<T>, Queue<T> has a public
constructor
that takes no parameters and constructs an empty queue, along with a
public
Count
property that gets the number of elements in the queue (as an int).
It also has the following public methods:
- An
Enqueue
method that takes a single parameter of type T and places it at
the back of the queue.
- A
Peek
method that takes no parameters and returns the element (of type
T) at the front of the queue without changing the queue’s
contents. If the queue is empty, this method throws an
InvalidOperationException.
- A
Dequeue
method, which takes no parameters and removes and returns the
element at the front of the queue. If the queue is empty, this
method throws an InvalidOperationException.
To implement a capital gain calculator using a Queue<T>, we first
need to determine what type to make the elements. We will need to store
the purchase price of each share we buy in the queue. An appropriate
type for storing monetary amounts is the
decimal
type.
Therefore, we will use an initially empty Queue<decimal>. Each
time we buy shares, we enqueue the purchase price of each share onto the
queue. When we sell shares, we need to compute the sum of the capital
gains for all of the shares we sold. To get the capital gain for a
single share, we dequeue its original purchase price from the queue, and
subtract that purchase price from the selling price. Using the queue in
this way ensures that we sell the shares in FIFO order.
Implementing a Queue
Implementing a Queue
We will approach the implementation of a queue much like we did the
implementation of a
stack
- we will use part
of an array to store the elements, and create a larger array as needed.
However, efficiently implementing a stack is easier because we only need
to access one end of a stack, but we need to access both ends of a
queue. Suppose, for example, that we were to use the initial part of the
array, as we did for a stack; i.e.:
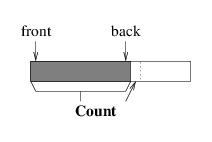
This implementation works well as long as we are only enqueuing elements
— each element is placed at the back, much like pushing an element onto
a stack. However, consider what happens when we dequeue an element. The
element is easy to locate, as it must be at index 0, but in order to
maintain the above picture, we would need to move all of the remaining
elements one location to the left. This becomes less efficient as the
number of elements in the queue increases.
One alternative is to modify the picture somewhat:
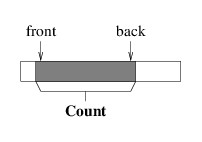
We can maintain this picture more efficiently, as there is now no need
to move the elements when we dequeue an element. It does mean that we
need to keep track of a bit more information, namely, the location of
either the front or the back, in addition to the Count (note that we
can compute the other end from these two values). But a more serious
problem remains. Notice that as we enqueue and dequeue elements, the
portion of the array that we are using works its way to the right.
Eventually, the back element will be the last element in the array.
However, this doesn’t mean that we are using the entire array, as the
front can be anywhere in the array.
To solve this problem, when we need to enqueue an element but the back
element is in the last array location, we place the next element at
index 0. It is as if we are imagining the array as being circular, as
the next location after the last is back at the beginning. The following
picture gives two views of such a “circular array” implementation:
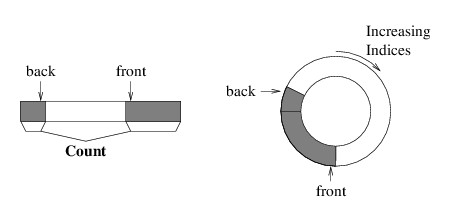
With this implementation, we only need to construct a larger array if we
completely fill the current array, and unless we need to do this, we
don’t need to move elements around. We need the following class members
in order to keep track of everything:
- a private T?[ ] field in which to store the elements;
- a public int Count property; and
- a private int field giving the index of the element at the front
of the queue (if the queue is empty, this can be any valid index).
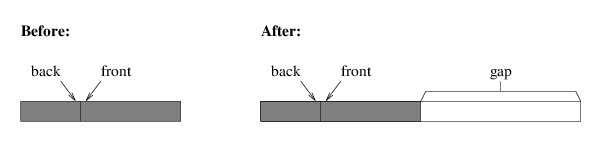
Let us now consider how we would implement Enqueue. We first need to
determine whether the array is full by comparing the Count with the
size of the array. If it is full, we need to construct a new array of
twice the size, as we did for both the StringBuilder
implementation
and the stack
implementation
. However,
we can’t simply copy the entire array to the beginning of the new array,
as we did for these other two implementations. To do so would leave a
gap in the middle of the queue, as shown in the following illustration:
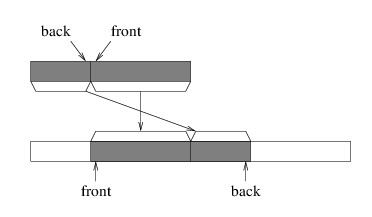
While there are several ways of copying the elements correctly, it may
be helpful to copy in such a way that the index of the front of the
queue remains unchanged; i.e., we copy as follows:
In order to copy the elements like this, we can use the static
method,
Array.Copy
.
This method takes the following parameters:
- The array to copy from.
- An int giving the index of the first element to copy.
- The array to copy to.
- An int giving the index in which to place the first element.
- An int giving the number of elements to copy.
Just figuring out how to fill in these parameters takes some work. Let’s
first consider the part that begins with the front of the queue. The
index of the first element to copy is the index of the front of the
queue, which we have in a private field. We want to place this
element at the same index in the new array. In order to compute the
number of elements to copy, first observe that we know the number of
elements in the original array (we can use either the Count property
or the length of this array, as these values are equal whenever we need
a larger array). To get the number of elements we want to copy, we can
subtract from this value the number of elements we are not copying —
i.e., the number of elements preceding the index of the front of the
queue. The number of elements preceding any index i is always i;
hence, by subtracting the index of the front of the queue from the
Count, we get the number of elements we are copying by this call.
Now let’s see if we can figure out the parameters for the other call.
The first element we want to copy is at index 0. We want to place it
immediately following the elements we have already copied. Because the
last of these elements occupies the last index of the original array,
whose size is currently the same as the Count, the next index is
just the Count. The number of elements we want to copy, as we have
already argued, is the index of the front of the queue.
Once we have the elements copied to the new array, the hardest part is
done. After we do this, we just need to copy the reference to the new
array into the array field.
Once we have ensured that there is room in the array to add a new
element, we can complete the Enqueue method. We need to place the
element at the back of the queue. We can obtain the proper location by
adding the Count to the index of the front of the queue, provided
this value is not beyond the end of the array. If it is, then we need to
wrap it around by subtracting the length of the array. We can then
increment the number of elements, and we are (finally) done.
The Peek method is straightforward — after verifying that the queue
is nonempty, we simply return the element at the front. The Dequeue
method isn’t much more difficult. We can obtain the element we want to
return using the Peek method. We then need to place the default
element of type T at the front, and update both the index of the
front of the queue and the Count before returning the element we
obtained ealier from Peek. The only slightly tricky part is making
sure that when we update the index of the front of the queue, we don’t
go outside of the array. If we do, we need to wrap it back around to 0.