Subsections of Linked Lists
Introduction to Linked Lists
Introduction to Linked Lists
To build a linked list, we first need to define a simple class,
which we will call LinkedListCell<T>. Instances of this class will
be the individual building blocks that we will chain together to form
linked lists. T will be the type of the data item we will store in
each cell - i.e., the type of the data items that we will store in the
linked list.
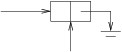
A LinkedListCell<T> will contain two public
properties, which can each be implemented using the default
implementation:
- The Data property gets or sets the data item (of type T)
stored in the cell.
- The Next property gets or sets the next LinkedListCell<T>?
in the linked list. If there is no next cell, it gets null.
Because this is a class, it is a reference
type
; hence, the
Next property will store a reference to another
LinkedListCell<T>.
The only other member of this class is a public constructor. Because we don’t want to make Data nullable unless the user code specifies a nullable type for T, we need to make sure it is initialized to an appropriate value. For this purpose, we use a public constructor that takes the following parameters:
- The initial Data value (of type T).
- The next cell in the list (of type LinkedListCell<T>?).
It simply sets the values of the two properties to the given parameters.
Although the LinkedListCell<T> class is simple, we can use its
Next property to chain together long sequences of its instances:
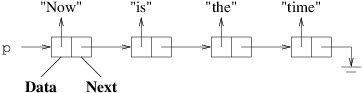
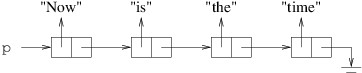
In the above figure, p is a LinkedListCell<string> variable.
Each box in the figure represents an instance of
LinkedListCell<string>. The boxes are each divided into two
regions to indicate the two public properties for each cell. Because
string is a reference type, we have shown each Data property as
a reference to a string. The rightmost arrow that is bent downward
is used to represent null. The entire sequence of
LinkedListCell<string>s is called a linked list. Given this
linked list:
p.Data is “Now”;p.Next.Data is “is”;p.Next.Next.Data is “the”;p.Next.Next.Next.Data is “time”; andp.Next.Next.Next.Next is null (if we try to get its Data
property, we will get a NullReferenceException).
Tip
When writing code for using and manipulating linked lists, it is helpful to draw pictures of the lists, as we do throughout this chapter.
Suppose we want to insert the string “Notice:” at the beginning of
this linked list. We use the LinkedListCell<T> constructor to initialize a new cell:
LinkedListCell<string> cell = new("Notice", p);
This yields the following:
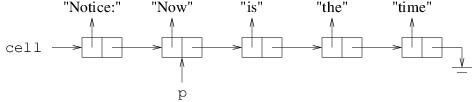
This is what we want, unless we want p to refer to the beginning of
the linked list. We can take care of this by copying the value of cell
to p:
This yields the following (we are not showing cell because we are no
longer interested in it, but it still refers to the same cell):

We can also undo the above statement by copying into p the reference
in the Next property of the cell to which p refers:
(If this statement occurs in a context in which the compiler cannot determine that p is not null, an ! will need to be inserted prior to .Next.) This yields the following:
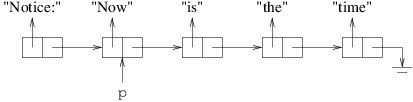
This has the effect of removing “Notice:” from the linked list to which
p refers. Though we haven’t shown it, cell still refers to the cell
containing “Notice:”; hence, we still have access to the linked list
beginning with this cell. However, if the program had no references
remaining to this cell, we would have no way to retrieve it, and it
would be available for garbage collection. This illustrates how we must
take care not to lose a part of a linked list (unless we are finished
with it) when we are manipulating it.
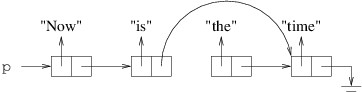
With a little more work, cells can be inserted into or removed from
arbitrary locations in a linked list. We will discuss how to do this in
subsequent sections. For now let us simply observe that linked lists do
not always continue until they reach a null - they can contain
cycles, as follows:
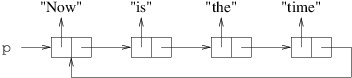
This is occasionally what we want, but more often, this is a programming
error that leads to an infinite loop.
Implementing Stacks and Queues with Linked Lists
Implementing Stacks and Queues with Linked Lists
Because linked lists store data elements in linear sequences, they can
be used to give alternative implementations of stacks and queues. One
advantage to using linked lists is that we don’t have to worry about
filling up something like an array - we can just keep allocating cells
as long as we need to (unless we run out of memory).
Implementing a stack using a linked list is particularly easy because
all accesses to a stack are at the top. One end of a linked list, the
beginning, is always directly accessible. We should therefore arrange
the elements so that the top element of the stack is at the beginning of
the linked list, and the bottom element of the stack is at the end of
the linked list. We can represent an empty stack with null.
We therefore need a private LinkedListCell<T>? field to implement a
generic stack Stack<T> using a linked list. This field will refer
to the cell containing the data item at the top of the stack. If the stack is empty, this field will be null; hence, this field should be null initially. A public
Count property will be used to keep track of the number of elements in
the stack.
The public methods Push, Peek, and Pop are then fairly
straightforward to implement. For Push we need to add the given
element to a new cell at the beginning of the linked list, as shown in
the previous
section
, and
update the Count. To implement Peek, if the stack is nonempty,
we simply return the Data property of the cell at the beginning of
the linked list; otherwise, we throw an InvalidOperationException. Note that we can determine whether the stack is empty by examining either the LinkedListCell<T>? field or the Count property; however, examining the LinkedListCell<T>? field allows the compiler to determine that the Data property of the first cell can be accessed without throwing a NullReferenceException.
To implement Pop:
- Using Peek, obtain the element to be returned.
- Remove the first element from the linked list as shown in the
previous
section
.
- Update the Count.
- Return the retrieved value.
Note that the call to Peek in step 1 ensures that the stack is nonempty before we remove the first element; however, the compiler won’t be able to determine this.
Implementing a queue is a little more involved because we need to
operate at both ends of the linked list. For efficiency, we should keep
a reference to the last cell in the linked list, as this will allow us
to access both ends of the linked list directly. We will therefore have
the following:

We now need to decide which end to make the front of the queue. As we
saw in the previous
section
, both
inserting and removing can be done efficiently at the beginning of a
linked list. Likewise, it is easy to insert an element at the end if we
have a reference to the last cell. Suppose, for example, that last
refers to the last cell in a linked list, and that cell refers to a
LinkedListCell<T> that we want to insert at the end. Suppose
further that the linked list is not empty (that will be a special case
that we’ll need to handle). Thus, we have the following:

To insert this cell at the end of the linked list, we just need to copy
the reference in cell to the Next property of the cell to which
last refers:
On the other hand, removing the last cell is problematic, even if we
have a reference to it. The problem is that in order to remove it from
the linked list, we need to change the Next property of the
preceding cell. Unfortunately, the only way to obtain that cell is to
start at the beginning of the list and work our way through it. If the
linked list is long, this could be quite inefficient.
Note
It doesn’t help any to keep a reference to the next-to-last cell, as
we encounter the same problem when we need to update this reference
after removing the last cell — we don’t have a reference to its
preceding cell.
Because we need to
remove elements from the front of a queue, but not from the back, we
conclude that it will work best to make the beginning of the linked list
the front of the queue. We therefore need the following private
fields to implement a generic queue Queue<T>:
- A LinkedListCell<T>? giving the element at the front of the
queue. This will be the beginning of the linked list of queue
elements.
- A LinkedListCell<T>? giving the element at the back of the
queue. This will be the last cell in the linked list of queue
elements.
As we mentioned earlier, adding an element to an empty queue is a
special case that we will need to handle separately. For this reason, it
doesn’t matter what values the two LinkedListCell<T>? fields
contain when the queue is empty - we can always detect when the queue is
empty by checking the Count. The initialization of the two
LinkedListCell<T>? fields is therefore unimportant. It is easiest
to just leave them null.
Let us now consider the implementation of the Enqueue method. We
need to consider two cases. We’ll first consider the case in which the
queue is empty. In this case, we need to build the following linked
list:
We therefore need to:
- Construct a new LinkedListCell<T> containing the element we want to enqueue and no next cell.
- Assign it to the field denoting the front of the queue.
- Assign it to the field denoting the back of the queue.
- Update the Count.
If the queue is nonempty, the only step that changes is Step 2. Because
the queue is nonempty, we don’t want to make the new cell the front of
the queue; instead, we need to insert it at the end of the linked list,
as outlined above.
The implementations of the Peek and Dequeue methods are
essentially the same as the implementations of the Peek and Pop
methods, respectively, for a stack.
The implementations described in this section are simpler than the
implementations using arrays, mainly due to the fact that we don’t need
to rebuild the structure when we fill up the space available. While
these implementations are also pretty efficient, it turns out that the
array-based implementations tend to out-perform the linked-list-based
implementations. This might be counterintuitive at first because
rebuilding the structures when the array is filled is expensive.
However, due to the fact that we double the size of the array each time
we need a new one, this rebuilding is done so rarely in practice that it
ends up having minimal impact on performance. Due to hardware and
low-level software issues, the overhead involved in using arrays usually
ends up being less.
Finding Prime Numbers
Finding Prime Numbers
An integer greater than
$ 1 $ is said to be prime if it is not divisible
by any positive integers other than itself and
$ 1 $. Thus,
$ 2 $,
$ 3 $, and
$ 5 $ are
prime, but not
$ 1 $ (it is not greater than
$ 1 $) or
$ 4 $ (it is divisible by
$ 2 $).
Because every integer is divisible by itself and
$ 1 $, we will call any
other positive factors nontrivial factors; thus, a prime number is an
integer greater than
$ 1 $ that has no nontrivial factors. The study of
prime numbers dates back to at least the third century BC. One of the
earliest known algorithms finds all prime numbers less than a given
integer
$ n $. This algorithm is known as the Sieve of Eratosthenes, and
is attributed to the Greek mathematician Eratosthenes of Cyrene (c. 276
BC - c. 194 BC).
The most basic version of this algorithm operates as follows:
- Place all integers greater than
$ 1 $ and less than
$ n $ in order in a
list.
- For each element
$ k $ in the list, remove all subsequent elements
that are divisible by
$ k $.
- The remaining values are the prime numbers less than
$ n $.
For example, suppose
$ n = 20 $. We then place the integers from
$ 2 $
to
$ 19 $ in a list:
$$
2\ 3\ 4\ 5\ 6\ 7\ 8\ 9\ 10\ 11\ 12\ 13\ 14\ 15\ 16\ 17\ 18\ 19
$$
We then remove all numbers following
$ 2 $ that are divisible by
$ 2 $:
$$
\require{cancel}
2\ 3\ \cancel{4}\ 5\ \cancel{6}\ 7\ \cancel{8}\ 9\ \cancel{10}\ 11\
\cancel{12}\ 13\ \cancel{14}\ 15\ \cancel{16}\ 17\ \cancel{18}\ 19
$$
We then remove all numbers following
$ 3 $ that are divisible by
$ 3 $:
$$
2\ 3\ \cancel{4}\ 5\ \cancel{6}\ 7\ \cancel{8}\ \cancel{9}\ \cancel{10}\ 11\
\cancel{12}\ 13\ \cancel{14}\ \cancel{15}\ \cancel{16}\ 17\ \cancel{18}\ 19
$$
The algorithm continues, but none of the succeeding iterations finds any
values to remove. Therefore,
$ 2, 3, 5, 7, 11, 13, 17 $, and
$ 19 $ are the
prime numbers less than
$ 20 $.
To see why this algorithm gives us exactly the prime numbers less than
$ n $, first note that because we only remove a number when we find a
nontrivial factor, we only remove non-primes from the list. What may be
a little less obvious is that we remove all non-primes from the list.
To see this, suppose
$ m $ is a non-prime less than
$ n $, and let
$ a $ be
its smallest nontrivial factor. Then
$ a $ must be prime because any
nontrivial factor of
$ a $ would be less than
$ a $ and would also divide
$ m $.
$ a $ therefore will not be removed from the list. When
$ k = a $ in Step 2,
$ m $ will be removed.
There is actually a good reason why the first two iterations in the
above example removed all of the non-primes — once the algorithm reaches
a divisor
$ k $ such that
$ k^2 \geq n $ (in this
example,
$ 5^2 = 25 \geq 20 $), all of the
non-primes will have been removed. To see why this is true, let
$ m $ and
$ a $ be as above. We can then write
$$
m = ab
$$
where
$ a \leq b $, and
$ m $ is removed from the list when
$ k = a $. We can then multiply both sides of the above
equation by
$ a/b $, yielding:
$$
\frac{am}{b} = a^2.
$$
Finally, because
$ a \leq b $,
$ a/b \leq 1 $.
Therefore,
$$
m \geq a^2.
$$
We conclude that if
$ m $ is a non-prime greater than
$ 1 $, it is removed
when the algorithm reaches some value
$ k $ with
$ k^2 < n $. We can therefore optimize the
algorithm by stopping when
$ k^2 \geq n $.
We can implement this algorithm using a linked list. A linked list is an
appropriate data structure for this algorithm because once the list is
built, all of the processing involves iterating through it from
beginning to end — the same direction the links go.
To implement Step 1, it is easier to build the list from back to front,
as we don’t need to maintain a separate reference to the end of the
list. This step then consists of a loop that iterates from
$ n - 1 $ down to
$ 2 $, with each iteration adding
to the front of the list a cell containing the loop index.
In order to be able to implement Step 2, we will need to know how to
remove a cell from a linked list. Suppose, for example, that we want to
remove the cell referring to “the” from the following linked list:
To remove it, we need the cell that precedes it to be followed by the
cell that follows it:
In order to change that reference, we need a reference to the cell that
precedes the cell we want to remove:
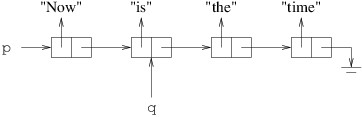
We can then remove the cell following the cell referenced by q as
follows:
Now that we know how to remove a cell from a linked list, let’s consider
Step 2 of the algorithm. For one value of
$ k $, we need to remove all
subsequent values that are divisible by
$ k $. In terms of the linked
list, we need to start this process with the cell containing
$ k $. For
example, consider the second iteration from the example above — i.e.,
when
$ k = 3 $:

We need to iterate p through the linked list, checking the next cell
on each iteration to see whether its contents are divisible by
$ k $. We
can check for divisibility by
$ k $ using the remainder
operator
— i.e.,
$ k $ divides
$ m $ if
$ m \mathbin{\texttt{%}} k $ is 0. Thus, the first iteration
would see if
$ 3 $
divides
$ 5 $. It doesn’t, so we advance p to the next cell (containing
$ 5 $). We then see if
$ 3 $ divides
$ 7 $. Again it doesn’t, so we advance p to
the next cell (containing
$ 7 $). At this point,
$ 3 $ divides
$ 9 $, so we remove
the cell containing
$ 9 $ as shown above. This gives us the following linked
list:

Note that we have not yet advanced p, and indeed we don’t want to, as
$ 11 $ is the next value we want to check. Thus, on each iteration, if
$ k $
divides the value in the cell following p, we remove that cell;
otherwise, we advance p to that cell. We iterate this loop as long as
there is a cell following p.
The loop described above represents a single iteration of the loop
described for Step 2. Thus, for Step 2, we need to iterate a variable
through the list, performing the above on each iteration. We stop when
we either have run off the end of the list or have reached a value of
$ k $ such that
$ k^2 \geq n $. Note that at the end of
each iteration, we want to advance to the next cell.
Warning
Make sure when iterating through a linked list that you keep a
reference to the beginning of the list. Otherwise, you will lose all
of your list.