Subsections of Input/Output
Dialogs
Dialogs
Dialogs are windows displayed by a program for the purpose of exchanging specific information with the user. There are two kinds of dialogs:
- Modal dialogs block all other interaction with the program until the dialog is closed.
- Non-modal dialogs allow the user to interact with the program in other ways while the dialog is open.
We will examine three classes provided by Microsoft® .NET 6, each of which implements a modal dialog. .NET provides various other classes, such as FolderBrowserDialog
, FontDialog
, and ColorDialog
, that also implement specific kinds of dialogs. We conclude by discussing how custom dialogs may be built using Visual Studio®.
Subsections of Dialogs
MessageBoxes
Message Boxes
The MessageBox
class (found in the System.Windows.Forms
namespace) provides a simple mechanism for displaying a message and obtaining one of a few simple responses from the user. The most common usage of a MessageBox is to call one of its various Show
methods, each of which is static
. The simplest Show
method takes a string as its only parameter. The method then displays this string in a modal dialog containing an “OK” button. Thus, for example,
MessageBox.Show("Hello world!");
will display the following dialog:
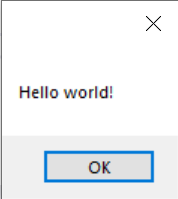
Because the dialog is modal, it will block all other interaction with the program until the user closes it by clicking either the “OK” button or the “X” in the upper right. Furthermore, the Show method will not return until that time.
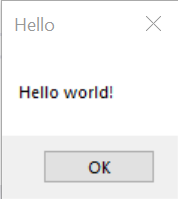
Other Show methods allow greater customization of a MessageBox. For example, one Show
method takes as an additional parameter a second string giving a caption for the MessageBox. Thus, the statement,
MessageBox.Show("Hello world!", "Hello");
will display the following modal dialog:
Other Show methods allow the buttons to be customized. For example, one Show
method takes, as its third parameter, an element from the MessageBoxButtons
enumeration
. This enumeration
contains the following values:
- MessageBoxButtons.AbortRetryIgnore: Buttons labeled “Abort”, “Retry”, and “Ignore” are shown.
- MessageBoxButtons.CancelTryContinue: Buttons labeled “Cancel”, “Try Again”, and “Continue” are shown.
- MessageBoxButtons.OK: A single button labeled “OK” is shown.
- MessageBoxButtons.OKCancel: Buttons labeled “OK” and “Cancel” are shown.
- MessageBoxButtons.RetryCancel: Buttons labeled “Retry” and “Cancel” are shown.
- MessageBoxButtons.YesNo: Buttons labeled “Yes” and “No” are shown.
- MessageBoxButtons.YesNoCancel: Buttons labeled “Yes”, “No”, and “Cancel” are shown.
The values above containing the word, “Cancel”, cause the “X” in the upper-right of the dialog to be enabled. Clicking this button in these cases is equivalent to clicking the “Cancel” button. The value, MessageBoxButtons.OK, also enables this “X” button, but in this case, clicking this button is equivalent to clicking the “OK” button. Using a Show without a MessageBoxButtons parameter also gives this behavior. For all other MessageBoxButtons values, this “X” button is disabled.
In order to provide appropriate functionality to each of the buttons, each Show method returns a value of type DialogResult
. This type is another enumeration containing the following values to indicate which button the user clicked:
- DialogResult.Abort
- DialogResult.Cancel
- DialogResult.Continue
- DialogResult.Ignore
- DialogResult.No
- DialogResult.None (this value won’t be returned by any of the Show methods)
- DialogResult.OK
- DialogResult.Retry
- DialogResult.TryAgain
- DialogResult.Yes
Suppose, for example, that we are writing a document formatter or some other application in which the user builds a document. If the user attempts to exit the program when the document is unsaved, we would like to give an opportunity to save the document. We can accomplish this with the following code:
DialogResult result = MessageBox.Show("The file is not saved. Really quit?", "Confirm Quit", MessageBoxButtons.YesNo);
if (result == DialogResult.Yes)
{
    Application.Exit();
}
The first statement displays the following dialog:
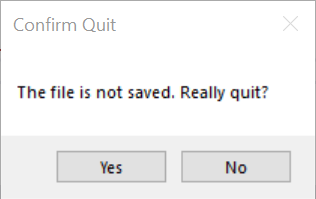
Again, because the dialog is modal, the Show method does not return until the user closes the dialog by clicking one of the two buttons (the “X” in the upper right is disabled). When the user does this, the dialog closes, and the Show method returns either DialogResult.Yes or DialogResult.No to indicate which button the user clicked. If the user clicked the “Yes” button, then the if-statement will cause the program to terminate. Otherwise, the program will continue with whatever code follows (probably nothing more, as the program will need to await further user action).
We can also decorate a MessageBox with an icon that indicates what type of message it is. This requires another Show
method having a fourth parameter of type MessageBoxIcon
. MessageBoxIcon is another enumeration. Some of its values are:
- MessageBoxIcon.Error:

- MessageBoxIcon.Information:

- MessageBoxIcon.None (no icon)
- MessageBoxIcon.Warning:

This enumeration contains a few other values as well, but they currently are simply duplicate values for the above icons or values that Microsoft recommends against using. To add a warning icon to the above example, we could replace the first statement with:
DialogResult result = MessageBox.Show("The file is not saved. Really quit?", "Confirm Quit", MessageBoxButtons.YesNo, MessageBoxIcon.Warning);
This will display the following dialog:
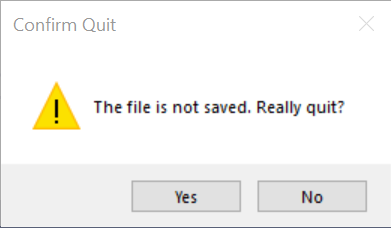
Notice that in the above example, the “Yes” button has the focus; i.e., pressing “Enter” has the same effect as clicking this button. It is usually desirable to have the safest response as the default - in this case, the “No” button. To achieve this, a Show
method having a fifth parameter, of type MessageBoxDefaultButton
, is required. MessageBoxDefaultButton is another enumeration having the following values to select an appropriate button to be the default:
- MessageBoxDefaultButton.Button1
- MessageBoxDefaultButton.Button2
- MessageBoxDefaultButton.Button3
- MessageBoxDefaultButton.Button4
Thus, the following statement:
DialogResult result = MessageBox.Show("The file is not saved. Really quit?",
    "Confirm Quit", MessageBoxButtons.YesNo, MessageBoxIcon.Warning,
    MessageBoxDefaultButton.Button2);
produces a dialog similar to the one above, but having the “No” button as its default.
There are other Show methods that allow additional fine-tuning; however, the ones described here cover most of the functionality. For details on other Show methods, see the documentation for the MessageBox class
.
File Dialogs
File Dialogs
The System.Windows.Forms
namespace contains two other classes that implement modal dialogs for obtaining file names from the user. These classes are OpenFileDialog
, which is designed to obtain the name of a file to read, and SaveFileDialog
, which is designed to obtain the name of a file to write. Because we often need to obtain the name of a file prior to doing file I/O, it is appropriate to consider these classes now.
Although these dialogs are visually separate from the window from which they are opened, it is possible (and usually desirable) to add instances of these classes to a form from the Design window
. Both can be found in the “Dialogs” section of the Toolbox. They can be added to the form simply by double-clicking on their names. They will not appear on the form itself, but in a separate area of the Design window. Their properties can then be modified in the same way as any other control. We will discuss some of these properties a bit later in what follows.
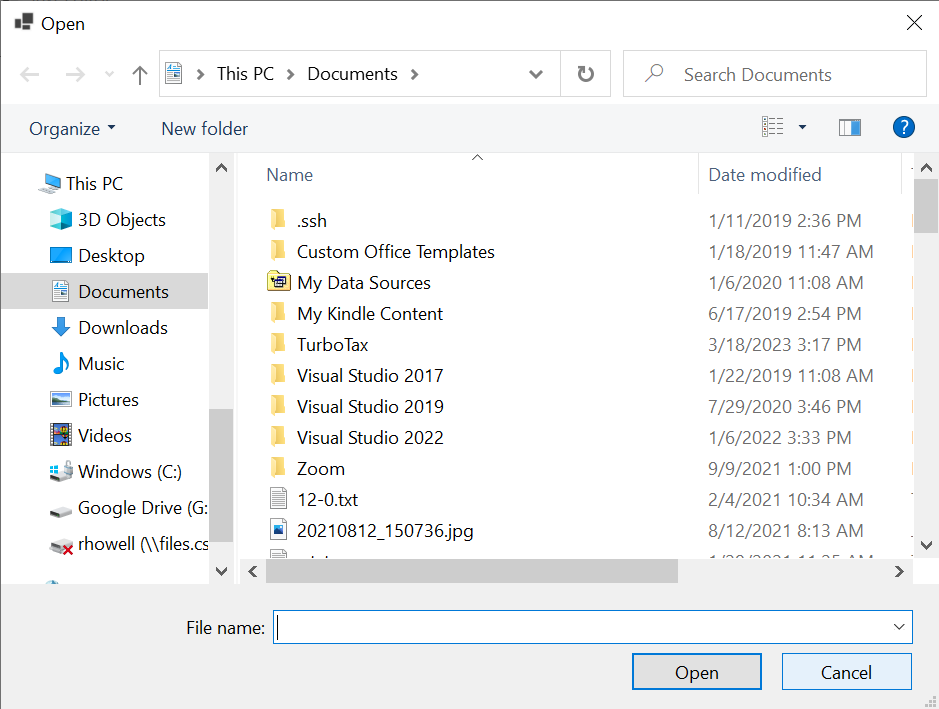
Each of these classes has a method called ShowDialog that takes no parameters. For example, if we call the ShowDialog
method of an OpenFileDialog, a dialog resembling the following will be opened:
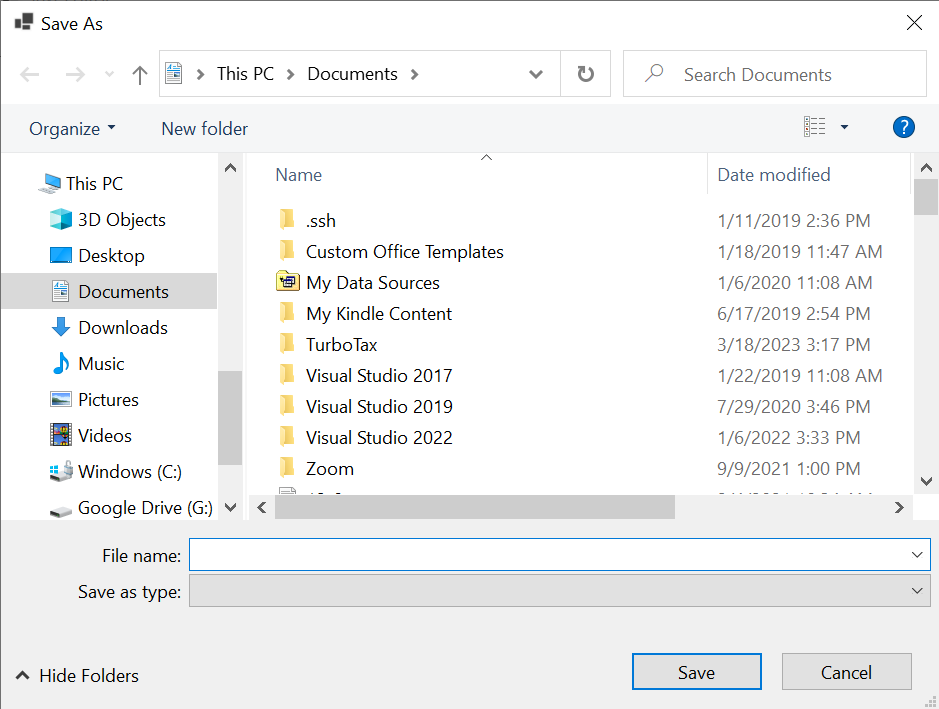
Similarly, calling the ShowDialog method of a SaveFileDialog opens a dialog resembling the following:
Because these dialogs are modal, the method call will not return until the user closes the dialog. It will then return a DialogResult
indicating how the user closed the form - either DialogResult.OK or DialogResult.Cancel (see the previous section
for more information on the DialogResult type). Therefore, if uxFileDialog is a variable referring to a file dialog, we typically use the following code template to display it:
if (uxFileDialog.ShowDialog() == DialogResult.OK)
{
    // Process the file
}
Thus, if the user selects a file, we process it; otherwise, we do nothing. In some cases, we might include an else containing code that needs to be executed if the user closes the dialog without selecting a file.
Processing a file will be discussed in the three sections that follow. However, one thing we will certainly want to do prior to processing the file is to obtain the file name that the user selected (after all, this is the reason we display a file dialog). We can obtain this file name via the dialog’s FileName
property
; for example,
string fileName = uxFileDialog.FileName;
Note that this and other properties are accessible for initialization purposes through a file dialog’s Properties window in the Designer. This is useful for an OpenFileDialog’s FileName property, as the default supplied by Visual Studio® is rather odd. Other properties that we might want to initialize here (in addition to (Name), the name of the variable referring to the dialog) include:
-
Title
, the title of the dialog (by default, “Open” for an OpenFileDialog or “Save As” for a SaveFileDialog).
-
Filter
, a filter string, which controls what file types will be displayed. An example of a filter string is: C# files|*.cs|All files|*.*. A filter string consists of an even number of components separated by vertical bars ("|"). Thus, the above filter string consists of four components. These components are grouped into pairs. The first component of each pair gives the string that will be displayed in the dialog to describe what files are displayed. The second component of each pair describes a pattern of file names to be displayed when the first component of that pair is shown. Use an asterisk ("*") in a pattern to denote any sequence of characters. The “.” in a pattern ending in “.*” does not need to be matched - a file without an extension will be listed if it matches the pattern to the left of the “.”. Multiple patterns, separated by semicolons (";"), may be listed in one component. Thus, the above filter string describes two filters that the user may choose from. The first filter is labeled, “C# files”, and lists all files ending in “.cs”. The second filter is labeled “All files”, and lists all files.
-
FilterIndex
indicates which pair in the filter string is currently being used. Note that the first pair has an index of 1, not 0.
-
AddExtension
and DefaultExt
control the dialog’s behavior when the user types in a file name without an extension. When this happens, if a filter with a unique extension is chosen, that extension will be appended, regardless of the values of these two properties. Otherwise, if AddExtension is True, the value of DefaultExt will be appended, following a “.”.
Other properties allow further customization of file dialogs. For more
details, see the OpenFileDialog
and SaveFileDialog
documentation.
Custom Dialogs
Custom Dialogs
While the dialogs provided by the .NET Framework are useful in a variety of applications, there are times when we need to be able to design our own special-purpose dialog to obtain specific information from the user. This section outlines how Visual Studio® can be used to build such a dialog.
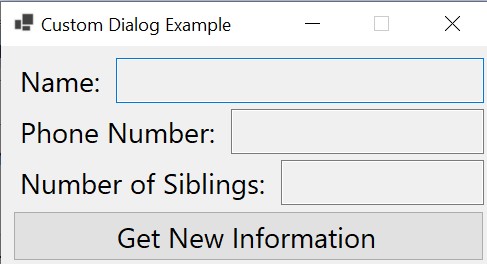
Let’s begin by considering a simple example. Suppose we are building an application that needs a dialog to obtain from the user the following pieces of information:
- a name;
- a phone number; and
- a number of siblings.
In order to keep the example simple, the program will simply display this information in its main window. Thus, the main window looks like this:
Clicking the “Get New Information” button will open our custom dialog, which will look like this:
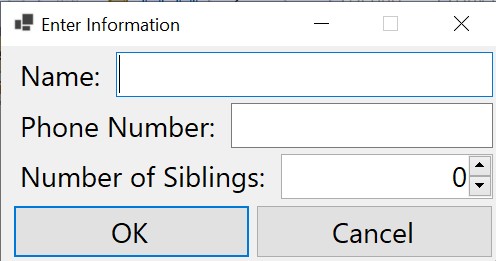
After the user enters the information, clicking “OK” will cause the information entered to be displayed in the main window. If the user clicks “Cancel”, the main window will be unchanged.
After building the main form in Visual Studio’s Design Window, we can build the dialog by creating another form. To do this, in the Solution Explorer, right-click on the project name and select “Add->Form (Windows Forms)…”. This will open a dialog for adding a new item, where the type of item is pre-selected to be a Windows Form. You will need to supply a name for the form. This name will serve as both a file name for a source file and the name of a class defined within this file. For example, we could choose the name, “InformationDialog.cs”, and the class will be named InformationDialog. Clicking the “Add” button will then open a new Design Window containing a form.
We can then use the Design Window to build this form as we would build any other form. In addition, the Button class has a DialogResult
property that governs certain behavior when buttons are used within a dialog. This property is of type DialogResult
. Setting it to a value other than None will cause the button to do the following when clicked, provided the form is displayed as a modal dialog
:
- Close the form.
- Return the value of the DialogResult property.
Thus, we should set the “OK” button’s DialogResult property to OK and the “Cancel” button’s DialogResult property to Cancel. Once we have done this, there is no need to define any event handlers for these buttons.
Furthermore, the Form
itself has two properties that can be set to provide shortcuts for these buttons. The AcceptButton
property, of type IButtonControl (a super-type of Button), can be used to cause the “Enter” key to activate a button on the form, as if that button had been clicked. Thus, we could set this property to the “OK” button. Similarly, the CancelButton
property (also of type IButtonControl) can be used to cause the “Esc” key to activate a button on the form. We could therefore set this property to the “Cancel” button.
While we don’t need any event handlers for this dialog, we still need to provide code to allow the class for the main window to access the values provided by the user. This can be accomplished with three public properties
, one for each of the three pieces of information the user can provide:
/// <summary>
/// Gets the name.  (There is already a Name property inherited from
/// the Form class, so we will use FullName.)
/// </summary>
public string FullName => uxName.Text;

/// <summary>
/// Gets the phone number.
/// </summary>
public string PhoneNumber => uxPhoneNumber.Text;

/// <summary>
/// Gets the number of siblings.
/// </summary>
public int Siblings => (int)uxSiblings.Value;
In order for the main window to be able to display this dialog, it needs to construct an instance of it. We can add to its class definition a private field initialized to such an instance:
/// <summary>
/// The dialog for obtaining information from the user.
/// </summary>
private InformationDialog _information = new();
Finally, we need an event handler for the “Get New Information” button. This event handler needs to display the InformationDialog as a modal dialog, and if the user closes it with the “OK” button, to copy the information provided by the user to the main window. A Form provides two methods for displaying it as a dialog:
- Show
displays the Form as a non-modal dialog
. It takes no parameters and returns nothing.
- ShowDialog
displays the Form as a modal dialog
. It takes no parameters and returns a DialogResult indicating how the user closed the dialog.
Thus, the event handler can display the dialog and retrieve its information much like it would do with a file dialog
:
/// <summary>
/// Handles a Click event on the "Get New Information" button.
/// </summary>
/// <param name="sender">The object signaling the event.</param>
/// <param name="e">Information on the event.</param>
private void NewClick(object sender, EventArgs e)
{
    if (_information.ShowDialog() == DialogResult.OK)
    {
        uxName.Text = _information.FullName;
        uxPhoneNumber.Text = _information.PhoneNumber;
        uxSiblings.Text = _information.Siblings.ToString();
    }
}
This git repository
contains the complete program described above.
Simple Text File I/O
Simple Text File I/O
Many of the I/O tools provided by .NET are found in the
System.IO
namespace. One
class that provides several general-purpose
static
methods
related to file I/O is the
File
class. Two of the static methods provided by this class are:
The File.ReadAllText method takes a string as its only
parameter. This string should give the path to a text file. It will
then attempt to read that entire file and return its contents as a
string. For example, if fileName refers to a string containing
the path to a text file, then
string contents = File.ReadAllText(fileName);
will read that entire file and place its contents into the string to
which contents refers. We can then process the string contents
however we need to.
The File.WriteAllText method takes two parameters:
- a string giving the path to a file; and
- a string? (i.e., a nullable
string - a string that may be null) giving the text to be written.
It will then attempt to write the given text as the entire contents of
the given file. If this text is null, an empty file will be written. Thus, if fileName refers to a string containing
the path to a file and contents refers to some string, then
File.WriteAllText(fileName, contents);
will write to that file the string to which contents refers.
Warning
When calling either of these methods, there are a number things that can
go wrong. For example, the file might be accessed through a network, and
access to the network might be lost before the method can complete. When
such an issue prevents the successful completion of one of these
methods, an exception is thrown. In the next
section
, we will discuss
how to handle such exceptions.
While these methods are quite easy to use, they are not always the best
ways of doing text file I/O. One drawback is that files can be quite
large - perhaps too large to fit in memory or within a single
string. Even when it is possible to read the entire file into a
single string, it may use enough memory that performance suffers. In
the section, “Advanced Text File
I/O”
, we will
present other techniques for reading and writing text files.
Exception Handling
Exception Handling
As was mentioned in the previous
section
, various
problems can occur when doing file I/O. Some of these problems include:
- Trying to write to a read-only file.
- Trying to access a file that is locked by another process.
- Accessing an external drive that becomes disconnected.
Note that some of these issues are beyond the programmer’s control,
while others may be tedious for the programmer to check. When one of these problems
prevents an I/O operation from completing successfully, an exception is
thrown. This section discusses how to handle such exceptions gracefully,
without terminating the program.
Tip
File dialogs
can be quite helpful in avoiding some of these exceptions, as they
can reject improper selections by the user.
The mechanism used to handle exceptions is the try-catch
construct. In its simplest form, it looks like:
try
{

    // Block of code that might throw an exception

}
catch
{

    // Code to handle the exception

}
If we are concerned about exceptions thrown while doing I/O, we would
include the I/O and anything dependent on it within the try-block.
If at any point within this block an exception is thrown, control
immediately jumps to the catch-block. Here, we would place code to
handle the exception - for example, displaying a message to the user.
Suppose, for example, that we want to count the number of upper-case
letters in a file whose name is in the string referenced by
fileName. We could use the following code:
try
{
    string contents = File.ReadAllText(fileName);
    int count = 0;
    foreach (char c in contents)
    {
        if (char.IsUpper(c))
        {
            count++;
        }
    }
    MessageBox.Show("The file contains " + count + " upper-case letters.");
}
catch
{
    MessageBox.Show("An exception occurred.");
}
Note
See the section, “The foreach
Statement
” for an
explanation of foreach loops. The
char.IsUpper
method returns a bool indicating whether the given char is an
upper-case letter in some alphabet.
We should always include within the try-block all of the code that
depends on what we want to read. Consider what would happen, for
example, if we tried to move the statement,
MessageBox.Show("The file contains " + count + " upper-case letters.");
outside the try-catch. First, we would have a syntax error
because the variable count is declared within the try-block, and
hence cannot be used outside of it. We could fix this error by declaring
and initializing count prior to the try statement. The resulting
code would compile and run, but consider what happens if an exception is
thrown during the reading of the file. Control immediately jumps to the
catch-block, where the message, “An exception occurred.”, is
displayed. After that, assuming we have made these changes to the above
code, control continues on past the catch-block to the code to
display the results. Because the file was not successfully read, it
really doesn’t make any sense to do this. The code given above, however,
displays a result only if the result is successfully computed;
otherwise, the exception message is displayed.
In the above example, the message, “An exception occurred.”, isn’t very
helpful to the user. It gives no indication of what the problem is. In
order to be able to provide more information to the user, we need more
information regarding the nature of the exception. The way we do this is
to use some additional code on the catch statement:
The word Exception above is a type. Every exception in C# is a
subtype of the Exception class. In this form of the catch
statement, we can include any subtype of Exception, including
Exception itself, as the first word within the parentheses. The
second word is a new variable name. One effect of this parenthesized
part is to declare this variable to be of the given type; i.e., ex is
of type Exception, and may be used within the catch block.
This form of the catch statement will catch any exception that can
be treated as the given type. If we use the type, Exception, as
above, the catch-block will still catch any exception. In addition,
the variable defined within the parentheses will refer to that
exception. Thus, the parenthesized part of this statement behaves much
like a parameter list, giving us access to the exception that was
thrown. Having the exception available to examine, we can now give more
meaningful feedback to the user. One rather crude way of doing this is
to use the exception’s
ToString
method to convert it to a string
representation, which can then be displayed to the user; for example,
catch (Exception ex)
{
    MessageBox.Show(ex.ToString());
}
Replacing the catch-block in the earler example with this
catch-block might result in the following message:
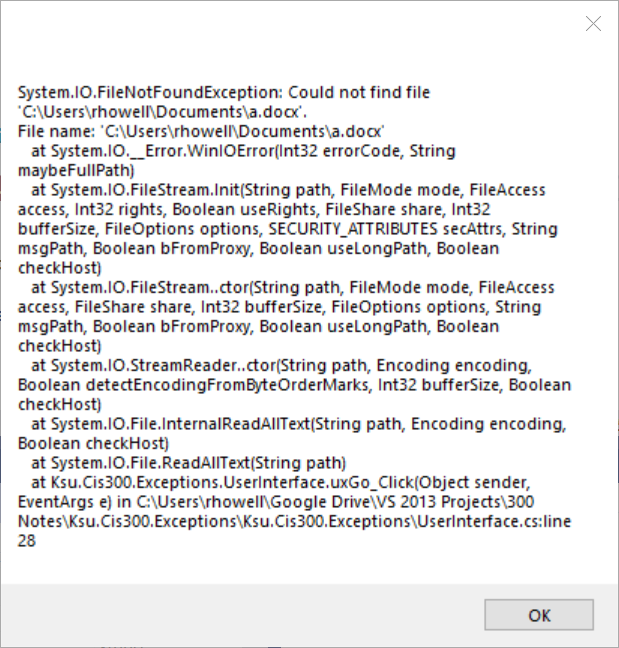
While this message is not something we would want to show to an end
user, it does provide helpful debugging information, such as the
exception thrown and the line that threw the exception.
Tip
Every object in C# has a
ToString
method. Hence, we can convert an instance of any type to string by
using its ToString method. This method will always return a
string, but depending on the original type, this string may or
may not be useful. For example, because there is no particularly meaningful way to
convert a Form to a string, its ToString method is not
especially useful.
A single try-block can have more than one catch-block. In such a
case, whenever an exception occurs within the try-block, control is
transferred to the first catch-block that can catch that particular
exception. For example, we can set up the following construct:
try
{

    // Code that may throw an exception

}
catch (DirectoryNotFoundException ex)
{

    // Code to handle a DirectoryNotFoundException

}
catch (FileNotFoundException ex)
{

    // Code to handle a FileNotFoundException

}
catch (Exception ex)
{

    // Code to handle any other exception

}
If we don’t need access to the exception itself in order to handle it,
but only need to know what kind of exception it is, we can leave off the
variable name in the catch statement. For example, if we are trying
to read from a file whose name is referenced by the string
fileName, we might handle a FileNotFoundException as follows:
catch (FileNotFoundException)
{
    MessageBox.Show("Could not find the file " + fileName);
}
Warning
Don’t use exception handling (i.e., try-catch) to handle cases that are expected to occur under normal conditions. In such cases, use an if-statement instead. Not only is this better style, but it is also more efficient.
Advanced Text File I/O
Advanced Text File I/O
Though the File.ReadAllText and File.WriteAllText methods
provide simple mechanisms for reading and writing text files, they are
not always the best choices. For one reason, files can be very large —
too large to fit into memory, or possibly even larger than the maximum
length of a string in C# (2,147,483,647 characters). Even when it
is possible to store the entire contents of a file as a string, it
may not be desirable, as the high memory usage may degrade the overall
performance of the system.
For the purpose of handling a sequence of input or output data in more
flexible ways, .NET provides streams. These streams are
classes that provide uniform access to a wide variety of sequences of
input or output data, such as files, network connections, other
processes, or even blocks of memory. The
StreamReader
and
StreamWriter
classes (in the
System.IO
namespace) provide read and write, respectively, access to text streams,
including text files.
Some of the more useful public members of the StreamReader class
are:
- A
constructor
that takes a string giving a file name as its only parameter and
constructs a StreamReader to read from that file.
- A
Read
method that takes no parameters. It reads the next character from
the stream and returns it as an int. If it cannot read a
character because it is already at the end of the stream, it returns
-1 (it returns an int because -1 is outside the range of
char values).
- A
ReadLine
method that takes no parameters. It reads the next line from the
stream and returns it as a string?. If it cannot read a line
because it is already at the end of the stream, it returns null.
- An
EndOfStream
property that gets a bool indicating whether the end of the
stream has been reached.
With these members, we can read a text file either a character at a time
or a line at a time until we reach the end of the file. The
StreamWriter class has similar public members:
- A
constructor
that takes a string giving a file name as its only parameter and
constructs a StreamWriter to write to this file. If the file
already exists, it is replaced by what is written by the
StreamWriter; otherwise, a new file is created.
- A Write
method that takes a char as its only parameter. It writes this
char to the end of the stream.
- Another
Write
method that takes a string? as its only parameter. It writes this
string? to the end of the stream. If the given string? is null, nothing is written.
- A
WriteLine
method that takes no parameters. It writes a line terminator to the
end of the stream (i.e., it ends the current line of text).
- Another
WriteLine
method that takes a char as its only parameter. It writes this
char to the end of the stream, then terminates the current line
of text.
- Yet another
WriteLine
method that takes a string? as its only parameter. It writes this
string? to the end of the stream, then terminates the current
line of text. If the string? is null, only the line terminator is written.
Thus, with a StreamWriter, we can build a text file a character at a
time, a line at a time, or an arbitrary string at a time. In fact, a
number of other Write and WriteLine methods exist, providing the
ability to write various other types, such as int or double. In
each case, the given value is first converted to a string, then
written to the stream.
Streams are different from other classes, such as strings or arrays,
in that they are unmanaged resources. When a managed resource, such as
a string or an array, is no longer being used by the program, the
garbage collector will reclaim the space that it occupies so that it can
be allocated to new objects that may need to be constructed. However,
after a stream is constructed, it remains under the control of the
program until the program explicitly releases it. This has several
practical ramifications. For example, the underlying file remains
locked, restricting how other programs may use it. In fact, if an
output stream is not properly closed by the program, some of the data
written to it may not actually reach the underlying file. This is
because output streams are typically buffered for efficiency — when
bytes are written to the stream, they are first accumulated in an
internal array, then written as a single block when the array is full.
When the program is finished writing, it needs to make sure that this
array is flushed to the underlying file.
Both the StreamReader and StreamWriter classes have
Dispose
methods to release them properly; however, because I/O typically
requires exception handling, it can be tricky to ensure that this method
is always called when the I/O is finished. Specifically, the
try-catch may be located in a method that does not have access to
the stream. In such a case, the catch-block cannot call the stream’s
Dispose method.
To handle this difficulty, C# provides a
using statement. A using statement is different from a using
directive, such as
A using statement occurs within a method definition, not at the top
of a code file. Its recommended form is as follows:
using ( /* declaration and initialization of disposable variable(s) */ )
{

    /* Code that uses the disposable variables(s) */

}
Thus, if we want to read and process a text file whose name is given by
the string variable fileName, we could use the following code
structure:
using (StreamReader input = new StreamReader(fileName))
{

    /* Code that reads and process the file accessed by the
     * StreamReader input */

}
This declares the variable input to be of type StreamReader and
initializes it to a new StreamReader to read the given file. This
variable is only visible with the braces; furthermore, it is read-only —
its value cannot be changed to refer to a different StreamReader.
The using statement then ensures that whenever control exits the
code within the braces, input’s Dispose method is called.
More than one variable of the same type may be declared and initialized
within the parentheses of a using statement; for example:
using (StreamReader input1 = new StreamReader(fileName1),
    input2 = new StreamReader(fileName2))
{

    /* Code that reads from input1 and input2 */

}
The type of variable(s) declared must be a subtype of
IDisposable
.
This ensures that the variables each have a Dispose method.
As a complete example of the use of a StreamReader and a
StreamWriter, together with a using statement for each, suppose
we want to write a method that takes as its parameters two strings
giving the name of an input file and the name of an output file. The
method is to reproduce the input file as the output file, but with each
line prefixed by a line number and a tab. We will start numbering lines
with 1. The following method accomplishes this:
/// <summary>
/// Copies the file at inFileName to outFileName with each line
/// prefixed by its line number followed by a tab.
/// </summary>
/// <param name="inFileName">The path name of the input file.</param>
/// <param name="outFileName">The path name of the output file.</param>
private void AddLineNumbers(string inFileName, string outFileName)
{
    using (StreamReader input = new StreamReader(inFileName))
    {
        using (StreamWriter output = new StreamWriter(outFileName))
        {
            int count = 0;
            while (!input.EndOfStream)
            {
                // Because input is not at the end of the stream, its ReadLine
                // method won't return null.
                string line = input.ReadLine()!;
                count++;
                output.Write(count);
                output.Write('\t');   // The tab character
                output.WriteLine(line);
            }
        }
    }
}
As noted above, a StreamReader’s ReadLine method has a return type of string? because it will return null if the end of the stream has already been reached. Furthermore, the compiler is unable to determine that the loop condition will prevent the call to ReadLine from returning null. Thus, in order to suppress the compiler warning when the returned string? is assigned to a string, we include a ! following the call to ReadLine, and document the reason with a comment above this line.
We can call the above method within a try-block to handle any
exceptions that may be thrown during the I/O. The catch-block will
not have access to either input or output, but it doesn’t need it.
If an exception is thrown during the I/O, the two using statements
will ensure that the Dispose methods of both the StreamReader
and the StreamWriter are called.
Other File I/O
Other File I/O
Not all files are plain text files — often we need to read and/or write
binary data. .NET provides the
FileStream
class for this purpose.
The FileStream class provides constructors for creating a
FileStream for reading, writing, or both. These constructors can be
used to specify how the file is to be opened or created, the type of
access to be allowed (i.e., reading/writing), and how the file is to be
locked. In most cases, however, a simpler way to construct an
appropriate FileStream is to use one of the following static
methods provided by the the
File
class:
- File.OpenRead(string
fn)
:
returns a FileStream for reading the file with the given path
name. A FileNotFoundException is thrown if the file does not
exist.
- File.OpenWrite(string
fn)
:
returns a FileStream for writing to the file with the given path
name. If the file exists, it will be replaced; otherwise, it will be
created.
Two of the most commonly-used methods of a FileStream are
ReadByte
and
WriteByte
.
The ReadByte method takes no parameters and returns an int. If
there is at least one byte available to read, the next one is read and
its value (a nonnegative integer less than 256) is returned; otherwise,
the value returned is -1 (this is the only way to detect when the end of
the stream has been reached). The WriteByte method takes a byte
as its only parameter and writes it to the file. It returns nothing.
Because a FileStream has no EndOfStream property, we must code a
loop to read to the end of the stream somewhat differently from what we
have seen before. We can take advantage of the fact that in C#, an
assignment statement can be used within an expression. When this is
done, the value of the assignment statement is the value that it
assigns. Thus, if input is a FileStream opened for input, we can
set up a loop to read a byte at a time to the end of the stream as
follows:
int k;
while ((k = input.ReadByte()) != -1)
{
    byte b = (byte)k;
    . . .
}
In the above code, the ReadByte method reads a byte from the file as
long as there is one to read, and assigns it to the int variable
k. If there is no byte to read, it assigns -1 to k. In either case,
the value of the assignment statement is the value assigned to k.
Thus, if the ReadByte method is at the end of the stream, it returns
-1, which is assigned to k, and the loop terminates. Otherwise, the
loop iterates, assigning k to b as a byte. The remainder of the
iteration can then use the byte read, which is in b.